How to record game clips with Steam
Capture, clip, and share footage with Steam Game Recording
Steam’s Game Recording feature has launched in beta, and it’s a surprisingly rich set of tools for what could have been a mere tacked-on gimmick. It comes with tooltips to give you some pointers, but they’re light on detail, so read on for a more comprehensive guide on how to record game clips with Steam – and how to share your clips around.
Part of the appeal behind Steam Game Recording is its versatility: it combines both the manual capturing capability of Nvidia ShadowPlay and the always-on background recording of tools like OBS. Maybe it’s not set up for streaming, as the latter is, but Steam’s ease of use, good recording quality, and integration with the already-familiar Steam interface make it a fine choice when simply capturing clips for personal viewing (or sharing with friends).
It also has a sort of ad-hoc instant replay feature, where you can immediately watch back a recording in Steam’s in-game overlay. Day being ruined by an Elden Ring boss? Review your last death to study their attack patterns. Missed a vital line of dialogue in a verbose RPG? Just pop open the overlay and replay the conversation.
This is possible using both of Steam Game Recording’s two modes, which are worth going over in a bit more detail. First, there’s Record in background. This will start passively recording a game as soon as you launch it, capturing everything until you reach either a time limit or a video file size limit (both of which you can set yourself). This is the better mode to choose if you want to record those spontaneous moments of unexpected drama/comedy/tragedy, where you might not get the chance to hit a record button ahead of time.
The catch? You’ll likely end up with a lot more gigabyte-hungry video eating into your SSD storage than with the second mode, Record on demand. With this, you manually start and end recording using shortcut inputs, meaning you only clip the moments you want to clip – no need to snip them out from hours of raw footage later. In turn, the downside with Record on demand is that if you forget to start recording (or simply don’t have the prescience to know if a clippable moment is approaching), it could come and go before you get it on film.
Both modes have their strengths and weaknesses, though they’re also customisable enough that you shouldn’t have much trouble finding a recording setup that suits your needs. This guide will walk you through how to use Steam Game Recording’s two capturing modes, how to edit and save specific clips, and finally, how to share those clips (or just save them to your PC). Note that this is specifically for recording on via the desktop Steam client; I've prepared a separate guide for recording clips on the Steam Deck.
How to record game clips with Steam
Step 1: First you’ll need to opt into the Steam beta client, which at the time of writing is the only way to access the Game Recording beta. If you’re reading this in the hopefully-not-too-distant future, where Game Recording has become part of the standard Steam client, you can skip this step.
To opt in, click Steam > Settings in the Steam desktop client, and open the "Interface" menu from the sidebar. Under "Client Beta participation", select "Steam Beta Update", then restart Steam to complete the beta installation.
Step 2: Go into Settings again and look for the new "Game Recording" section on the left sidebar. As explained above, you have two recording modes to choose from: Recording in background, and Record on demand. Click on the one you wish to use.
Regardless of which mode you're going with, check over the rest of settings beneath each option. These include recording quality – it defaults to High, but there’s a slightly sharper-looking Higher mode if you’re happy to trade a better picture for higher storage demands – and the folder in which raw recordings are saved. I don’t think you need to urgently change the latter, as you’ll mainly be dealing with clips via the Steam client itself. I also suggest you leave "Enable GPU hardware encoding" switched on.
Feel free, however, to customise any shortcut keys, and to choose whether you want Steam Game Recording to record audio from your microphone and other applications. Once ready, you can close the Settings menu.
This is where the guide must split up, depending on whether you want to record in the background, or if you’re recording on demand. First, we’ll look at background recording.
How to record game clips with Steam: Record in background
Step 3: Simply launch a game and play normally. Steam will, as it claims, record automatically, but if you open the standard Steam overlay (with Shift + Tab), you’ll notice a new video timeline at the top. You can even click at a point on the timeline to display an instant replay of that moment.
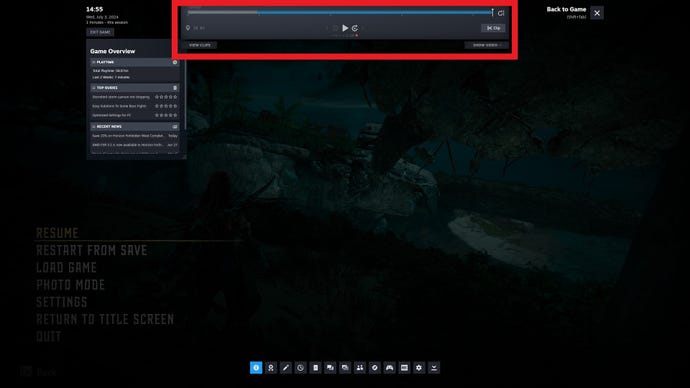
Step 4: If you want to just focus on playing, and to deal with clipping specific moments later, you can skip to the "How to edit and share clips" section below. But there are two features you might want to make use of, the first being timeline markers. At any point while recording in the background, you can press your marker shortcut (Ctrl+F12 by default) to set a blue marker at that point in the time, making it easier to return to that point later.
You can also edit, save, and share shorter clips directly from within this overlay. Click the "Clip" button and drag the yellow section’s start and end points over the timeline to prepare a clip comprised of that section. Then, click the yellow Save/Share button to export or publish it; full details on the different publishing options are in the "How to edit and share clips" section below.
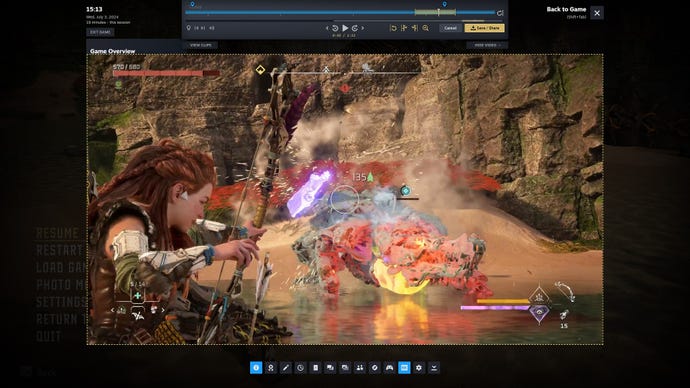
There’s no need to manually end background recording when you quit a game, though keep in mind that older recordings will be overwritten once you hit the maximum disk space allocation listed in the Game Recording section. Be sure you save any clips you want from that footage before it's gone.
How to record game clips with Steam: Record on demand
Step 3: With Record on demand selected in the settings, start playing your game and press the "Start/stop recording" shortcut – that’s Ctrl+F11 by default – at any time. When you want to end a clip, simply press the same shortcut to stop recording.
Unlike with the Record in background option, you won’t see a recording timeline in the Steam overlay until you’ve started recording your first clip in a game session. At any point after this, including during the recording itself, you can click on a clip (or clip in progress) to watch back the footage in the overlay. At any point while recording, you can also use the timeline marker shortcut (Ctrl+F12) to drop a blue marker at that point on the timeline. This doesn’t affect your recordings directly, but markers are useful for keeping track of particularly memorable highlights among your clips.
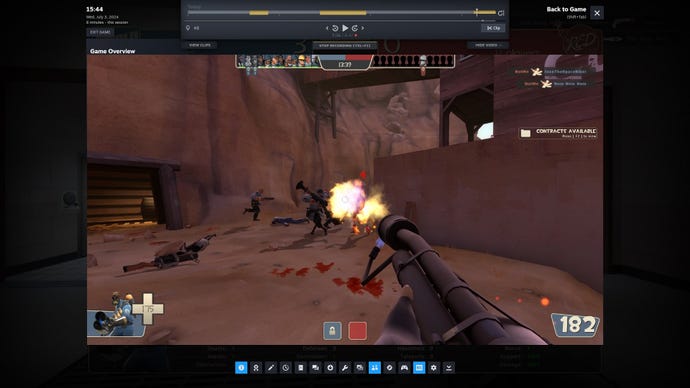
Step 4: Skip to the "How to edit and share clips" section if you prefer to edit and publish your clips outside of the game; if, however, you want these clips readied as soon as possible, you can save and share them from within the overlay as well. While a recorded clip is selected, click the Save/Share on the right; you have several options here, including "Export Video File", which creates an MP4 file to save on your PC. Full details on the sharing options are explained in the next section, coming up in 3, 2, 1...
How to edit and share clips
Step 1: Your clips are accessible via the Steam Library page for the game they were recorded in; they’ll be right at the top if you just recorded them recently, otherwise they’re a bit further down, in a "Recording and Screenshots" section. Click on the clip you want to edit or share and it will open that clip in a new window, showing both the clip and its timeline.
Step 2: To trim down a clip, you can move the timeline indicator to your desired start point, click the "Clip" button, and drag the yellow section of the timeline to select the duration of the finished clip. Alternatively, you can right-click on the timeline and select the clip start and end times that way.
Optionally, you can also add blue markers to the timeline, either through the right-click menu or by left-clicking on the marker icon in the little preview window that appears when you hover the cursor over a point on the timeline. These can also serve as start points for trimmed clips, by way of clicking on the marker and then clicking on the "Create Clip" scissor icon.
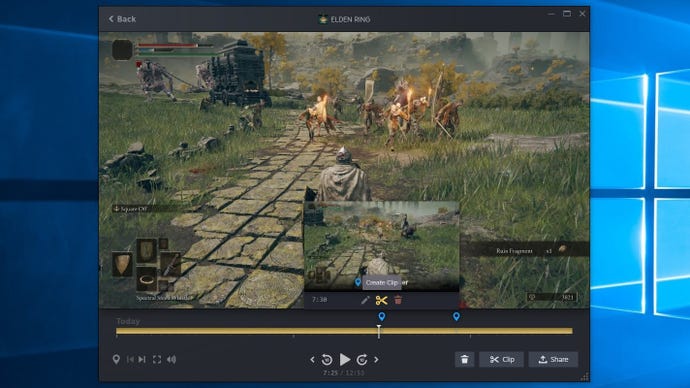
Step 3: Once you’ve set the start and end points of your clip – or if you’re happy with the clip length as it is – click the yellow Share/Save button in the bottom-right corner.
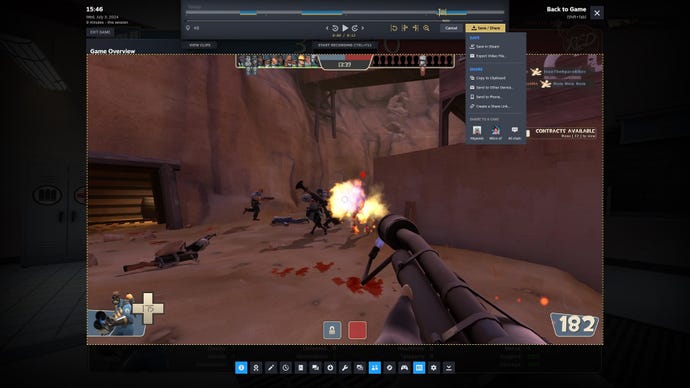
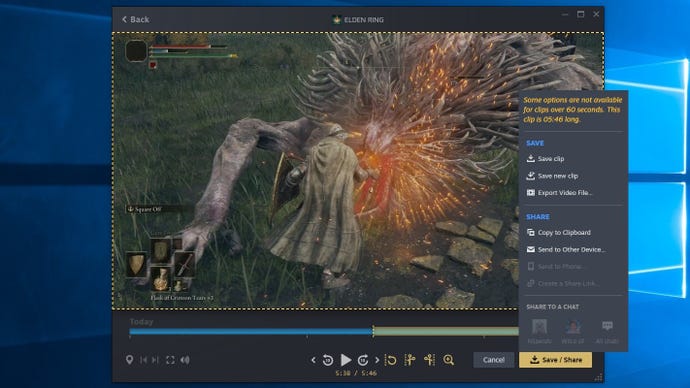
Step 4: You have quite a few options here. "Save clip" will rewrite the clip you selected from the Library page with this new, trimmed version; "Save new clip" will add the edited version alongside the original. "Export video file" will create an MP4 file of the clip that you can choose to save anywhere you like on your PC storage.
"Copy to Clipboard" is a bit of a weird one – it does indeed appear to add an MP4 copy of the clip to your clipboard, but pasting it into a Windows Explorer folder doesn’t seem to work. "Send to other device" makes the clip viewable and editable on any other PC, laptop, or Steam Deck you’ve previously logged into Steam with.
Finally, we have "Send to Phone", "Create a Share Link", and "Share to a Chat", all of which will be unavailable if the clip is over 60 seconds long. "Send to Phone" can quickly pop the clip over to your smartphone’s Steam app, but you also have the option to scan a QR code with your phone’s camera; this will present the clip in your phone’s browser, though the link will expire after two days.
"Create a Share Link" is basically the same function, giving you a choice of a text link or a QR code that you can (respectively) share immediately or scan on your phone. Both of these will, again, expire after two days. Lastly, "Share to a Chat" lets you choose a Steam friend or group chat to share the clip with. Selecting one will open up the Steam chat interface, but won’t actually upload and send the clip until you confirm Steam can do so.
For keeping permanent copies of clips, I recommend exporting an MP4 to your SSD or hard drive. You can always delete them later if they’re taking up too much room (or whack them on an external drive. Or upload them to cloud storage).
Steam Game Recording Q&A
Can I use Steam Game Recording to record non-Steam games?
Yes, if you can launch it through Steam by using the "Add a non-Steam game to my library" feature – I’ve tried this for games that I’d previously only played via rival services like the Epic Games Launcher, and Game Recording appears to work fine.
However, because all the recording, editing, and sharing tools are built into Steam directly, you can’t use it to record games that you’ve launched outside of Steam. If you were to, say, fire up Minecraft using Microsoft’s own launcher, without any involvement of Steam, you couldn’t use the latter for recording.
Why can’t I open the files in my raw recordings folder?
These files aren’t supposed to be watchable video files; think of them as the raw material with which Steam can build your finished videos, via saving them as clips and exporting them as MP4 files. If you’re trying to turn these raw recordings into clips, look in the Steam Library page for the game you recorded them in. You can edit, save, and export them from here, using the steps above.
Does Steam Game Recording affect performance?
It depends on your hardware. The good news is that most PC owners should only face a tiny performance impact, if it’s even noticeable at all: Game Recording, in Valve’s words, "takes advantage of Nvida and AMD graphics cards to remove most of the performance cost of creating video recordings".
Those with Intel GPUs, or integrated APUs like those found in the Steam Deck and Asus ROG Ally handhelds, will likely see a more noticeable drop in framerates while recording. That’s because the task of capturing footage is being handled by the CPU, unlike in Nvidia and AMD systems where the graphics card can do most of the heavy lifting.
